Quick Answer: We transformed our dated gold bathroom fixtures into modern bronze for just $26 using spray paint and painter’s tape. The key was starting with low-stakes fixtures we didn’t love anyway—perfect for first-time spray painting experiments.
My wife’s gasp when she first walked into our half bathroom during the house tour said everything. Wall-to-wall gold and brass in a tiny space right inside our front door—it was a lot. The textured gold walls, ornate gold mirror frame, and matching gold light fixture might work in some homes, but in our late-80s house with neutral pine and carpet everywhere else, it felt like stepping into a different decade.
We knew this would be one of our first projects, but we were already stretching our budget with the move. New fixtures would easily cost $150-300, and we actually liked the style of what we had—just not the color.
That’s when we decided to try spray painting our way out of the gold rush.
This post contains affiliate links. If you buy through my links, I earn a small commission at no extra cost to you—and it helps keep this blog running!
Why We Chose DIY Over Replace
The math was simple: new mirror and light fixture would cost $150-300, while spray paint makeover totaled $26. Risk level was low since we didn’t like them anyway.
We spent weeks looking for replacement fixtures that matched our style and budget. Everything we liked was expensive, and everything affordable looked cheap. When we found ourselves considering a $200 light fixture for a half bathroom, we decided to get creative.
The spray paint option appealed to us because we had nothing to lose. We already didn’t like the gold, it was a perfect learning opportunity for future projects, we could always replace later if it failed, and it cost a fraction of replacement with potential for great results.
What I Actually Bought: $26 Total
Supplies that worked:
- 2 cans Rust-Oleum Metallic Dark Bronze spray paint – $20 ($10 each)
- 3 new glass light covers – $6 ($2 each from hardware store)
What I already had:
- Painter’s tape and cardboard
- Utility knife for precise trimming
vs. Professional replacement estimate: $300-500 including fixtures and installation
The Step-by-Step Process (And My Learning Curve)
Mirror Transformation: Starting Simple
Step 1: Removal and Setup
- Lifted mirror off wall mount (just one screw)
- Set up workspace in garage with door open for ventilation
- Placed mirror on cardboard box
Step 2: Protection and Taping This was surprisingly fun, at least for me! I ran painter’s tape across the entire mirror face rather than using paper. Something satisfying about creating perfect parallel lines of tape and carefully trimming the edges.
Critical step: Used a utility knife to trim the tape precisely where the mirror meets the frame. This took patience—I had to angle the blade slightly under the frame edge to ensure complete paint coverage without getting any on the mirror glass.
Step 3: My First Spray Paint Lessons
- Distance matters: Started too close (4-5 inches) and created little dark splotches
- Learned: 8-10 inches gives even coverage without drips (read the instructions for your spray paint)
- Texture challenge: The raised pattern on the frame required multiple angles
My first coat was pretty terrible. I missed big chunks of the textured areas and had those puddle spots. But here’s what surprised me: most of the puddles smoothed out as the paint dried.
Light Fixture (Building on Lessons Learned)
Step 1: Safe Removal
- Shut off power at breaker
- Carefully removed fixture from wall
- Only needed to tape the three light socket openings
Step 2: Improved Technique
By fixture number two, I’d learned smooth, consistent motion prevents streaks, circular spray patterns cover textured surfaces better, even distance creates uniform finish, and patience between coats prevents rushing and mistakes.
What Three Coats Taught Me
I was surprised it actually took three coats to completely cover the original gold, but each coat was a learning experience:
Coat 1: Learning distance and motion (pretty rough results)
Coat 2: Better technique, but still needed more coverage
Coat 3: Confident application with smooth, even finish
In retrospect: Probably could have done it in two coats if I’d known what I was doing from the start. The learning curve was part of the process.
My Spray Painting Fumbles (And What They Taught Me)
Wrong Distance = Splotches
Holding the spray can 4-5 inches from the surface created little blobs of thick paint that looked awful when wet. Eight to ten inches gives even coverage, and most mistakes smooth out as they dry.
Inadequate Workspace Protection
Used a cardboard box that was too small for the mirror, which left a black spray paint patch permanently decorating our garage floor. Go bigger on workspace protection than you think you need.
Rushing the Textured Areas
Single-direction spraying on raised patterns missed coverage in grooves and recesses. Multiple angles and circular motions work better for textured surfaces.
Imperfect Tape Edges
Not pressing tape edges down firmly enough resulted in a couple tiny spots where paint leaked onto the mirror edge. Take extra time securing tape, especially at detail areas.
The Low-Stakes Learning Strategy
This was our first time spray painting fixtures, so we needed confidence-building. Starting with the mirror was strategic—we already disliked it, so “ruining” it wasn’t a real concern. I could replace it with a $25 Amazon mirror if we completely failed. It was also a simpler surface than the textured light fixture and good practice for developing technique.
Instead of fearing failure, we embraced experimentation. Since we were planning to replace these fixtures anyway, spray painting became a low-risk way to potentially save hundreds of dollars.
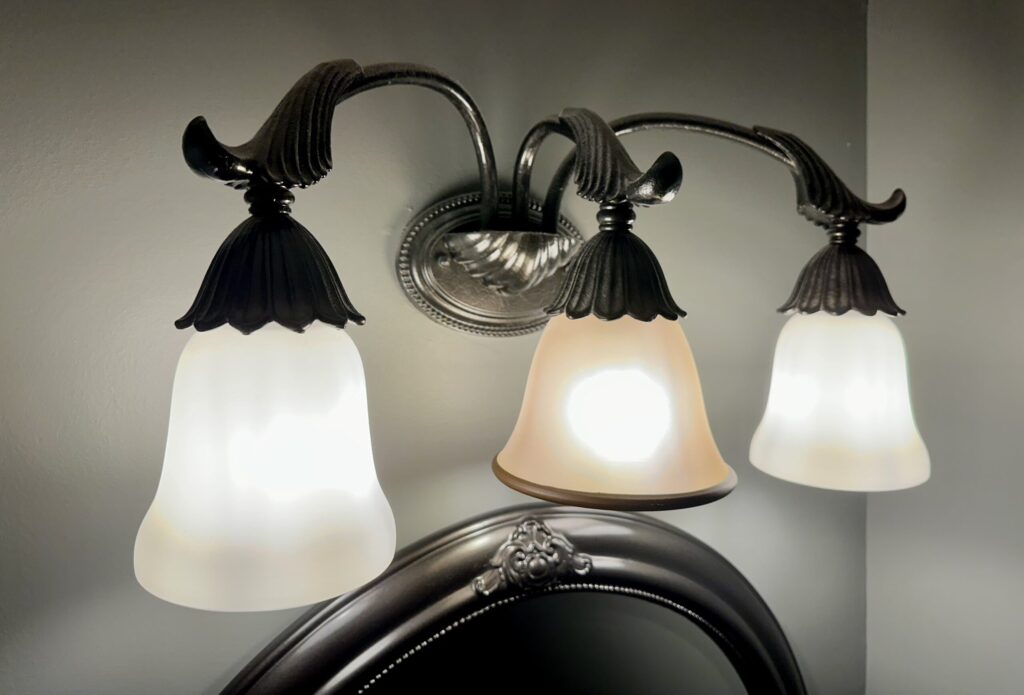
Results: Better Than We Hoped
Both my wife and I were thrilled with the immediate results. Unless you examine closely, it looks like we installed a brand new matching fixture set.
Long-term performance (3+ years later):
- No chipping or obvious wear
- Still looks fresh and intentional
- Accidentally broke a light cover changing bulbs (unrelated issue)
- Would absolutely do this project again
The tiny imperfections we can live with:
- A couple small darker spots from early spray technique (only visible up close)
- Two tiny gold spots where tape didn’t seal perfectly
- Slight texture differences where I over-sprayed
Bottom line: these minor flaws are invisible unless you’re specifically looking for them.
What This Project Actually Taught Us
This project gave us confidence for bigger things. I’ve since spray painted our outdoor fire pit multiple times with grill paint, spray painted our gas line, and we’re considering spray painting some cabinet hardware.
What I’d do differently:
- Use paper + tape method for large mirror coverage (faster than full-face taping)
- Get the trigger attachment for spray cans (saves fingers from cramps)
- Bigger workspace protection to avoid garage floor casualties
- Practice on cardboard first to dial in distance and motion
What worked perfectly:
- Starting with low-stakes fixtures for confidence building
- Taking time with utility knife trimming
- Multiple thin coats vs. trying to cover in one thick application
When Spray Painting Makes Sense (And When It Doesn’t)
Great candidates for spray paint makeovers:
- Fixtures you already dislike (low risk)
- Solid, non-moving parts (mirrors, light fixtures, hardware)
- Simple color changes (gold to bronze, brass to black)
- Budget constraints make replacement unrealistic
Skip spray painting if:
- You love the existing fixtures (too much risk)
- Moving parts or high-wear surfaces
- Fixtures are damaged or poor quality
- You can afford replacements you actually want
The Confidence Building Effect
The unexpected benefit: This project taught us that DIY transformations don’t have to be perfect to be successful. We proved to ourselves that we could tackle cosmetic improvements without professional help or huge budgets. We used these same skills on a recent bathroom caulking and my dryer vent replacement.
This project developed spray paint technique and distance control, precise taping and surface protection, working with textured surfaces, and project planning and workspace setup. We’ve used these skills on outdoor furniture, small appliances, and decorative items throughout the house.
The Bottom Line
Sometimes the best home improvements aren’t about buying new stuff—they’re about creatively working with what you have. Our $26 bathroom makeover taught us that expensive-looking results don’t require expensive materials, just patience and willingness to experiment.
The key to success: start with something you’re already planning to replace. That mindset shift turns potential “failure” into valuable learning experience, while potential success saves hundreds of dollars.
Our bathroom went from “wow, that’s a lot of gold” to “wow, that looks professional” for the cost of lunch for two. Not bad for a weekend project that gave us skills we’ve used throughout the house.
Money saved: $250-400
Time invested: 1.5 hours active work
New skills learned: Spray paint technique, surface preparation, project planning
Confidence gained: Knowing we can tackle cosmetic improvements without breaking the budget
Would I recommend this approach? Absolutely, especially for first-time spray painters. The combination of low stakes, high savings potential, and skill building makes it perfect for budget-conscious homeowners willing to try something new.
Ready to tackle your own fixture transformation? Check out how I learned to catch house warning signs early or see my approach to bathroom caulking challenges for more honest DIY adventures.
Common Questions
Eight to ten inches gives even coverage without drips. Closer than that — four to five inches — creates thick splotchy patches. Most distance mistakes smooth out as the paint dries, so don’t panic if the first coat looks rough. Read the instructions on your specific paint — the recommended distance varies by brand.
Three coats fully covered the original gold finish on both the mirror frame and the light fixture. The first coat shows the coverage gaps, the second improves things, and the third gives a consistent finish. If you’re experienced with spray paint, you might get there in two coats — but plan for three.
Three-plus years with no chipping or obvious wear on the mirror frame and light fixture body. Static surfaces in bathrooms hold up well. Moving parts, anything with direct water contact, or high-friction surfaces are poor candidates — the finish won’t last there. Humidity matters less than direct contact and wear.
Best candidates are solid non-moving surfaces: mirror frames, light fixture bodies, cabinet hardware. Skip faucets, handles, or anything that gets touched regularly or has water running over it — the finish won’t hold up under that kind of wear. If you’re unsure, start with something you already plan to replace; that way a failed experiment costs only the paint.