I noticed the signs in stages. Droppings near the workbench. A bag of bird seed with a hole chewed through the side. Then an actual mouse, running along the wall when I turned on the light.
The garage wasn’t overrun. Something was using it as a regular stop, and I wanted to make that stop less convenient. I went in expecting to fix the door. The door turned out to be the easy part.
If you’re still in the ‘do I actually have a problem’ stage, the 27 warning signs every homeowner should know covers the pest signals — including what established activity looks like versus something just passing through.
Here’s what I fixed and how.
The Door Sides: Where Mice Had Already Won
The bottom of the garage door wasn’t the main problem. The sides were.
When I looked at the vertical rubber seals that run along the left and right edges of the garage door — the seals that press against the door frame when the door is closed — I could see where mice had chewed through them. Not nibbled. Chewed through, leaving mouse-sized holes near the bottom corners on both sides.
I fixed them with Xcluder weatherstrip shields — metal patches with a self-adhesive backing that stick directly over the existing rubber seal. You trim them to length, peel the backing, and press them over the damaged area. The original rubber stays in place; the Xcluder covers it with a metal surface that mice can’t chew through.
The one thing I’d tell someone doing this: the Xcluder comes in bare metal and doesn’t match most garage trim. I painted mine after installing it. About 10 minutes with a brush and leftover trim paint, and it looks like it belongs there.
The Bottom Corners: A Three-Layer Fix
At the two bottom corners where the garage door frame meets the foundation, there were visible gaps — the kind that open up over decades of settling and temperature cycles. Not large, but enough.
I tackled each corner the same way, inside and out, because the outside is brick and needs a different approach than the interior surfaces.
From inside the garage, I packed the gap with steel wool first — compressed tight so it wouldn’t pull out — then filled over it with spray foam. Once the foam cured, I trimmed it flush and wrapped the whole repair with hardware cloth, pressing it against the wall and securing it with a staple gun. The steel wool keeps mice from chewing through the foam. The foam holds the steel wool in place. The wire mesh is a backstop.
From outside, the same gaps needed a different material. The exterior is brick, so I used a textured mortar replacement caulk with sand mixed in — the kind designed to match masonry joints. Applied into the gap and smoothed to match the surrounding mortar lines. From a few feet away it looks like it was always there.
The Floor Gap: Found It While Sealing the Corners
Between the garage floor slab and the driveway, there’s a gap. On my garage, it had opened up enough to be a potential entry point under the garage door — and I nearly missed it.
I found it while I was cleaning up spray foam from the sides and happened to look along the floor line. Once I saw it, it was obvious. There was also a crack running from that joint partway into the garage floor. It was small, but mice can squeeze through tiny gaps.
I filled both with a semi self leveling sealant — the kind made for concrete joints and cracks, which stays flexible after it cures and won’t crack the way rigid materials do. I let it level slightly on its own, then sprinkled dry sand over it before it set. The sand knocks down the sheen and blends it into the surrounding concrete much better than leaving the sealant bare.
Get down low and look along the floor line from the interior side, and again from outside on the driveway. You may find gaps you didn’t know were there.
The Brick Exterior: Seams and Small Voids
Beyond the corners and the floor joint, I went around the exterior brick looking for gaps where mortar had cracked or eroded — the kind of small voids that open up in older brick over time and give mice a foothold.
The mortar replacement caulk with sand handled all of these. It comes in a color that’s close to standard mortar, and the sand keeps the finish from looking like a shiny caulk bead in a masonry wall. I went through the base of the garage wall, around the door frame, and anywhere the mortar looked compromised. It’s not a structural repair — but it closes the gaps that matter for pest exclusion.
And Then I Walked Around the House
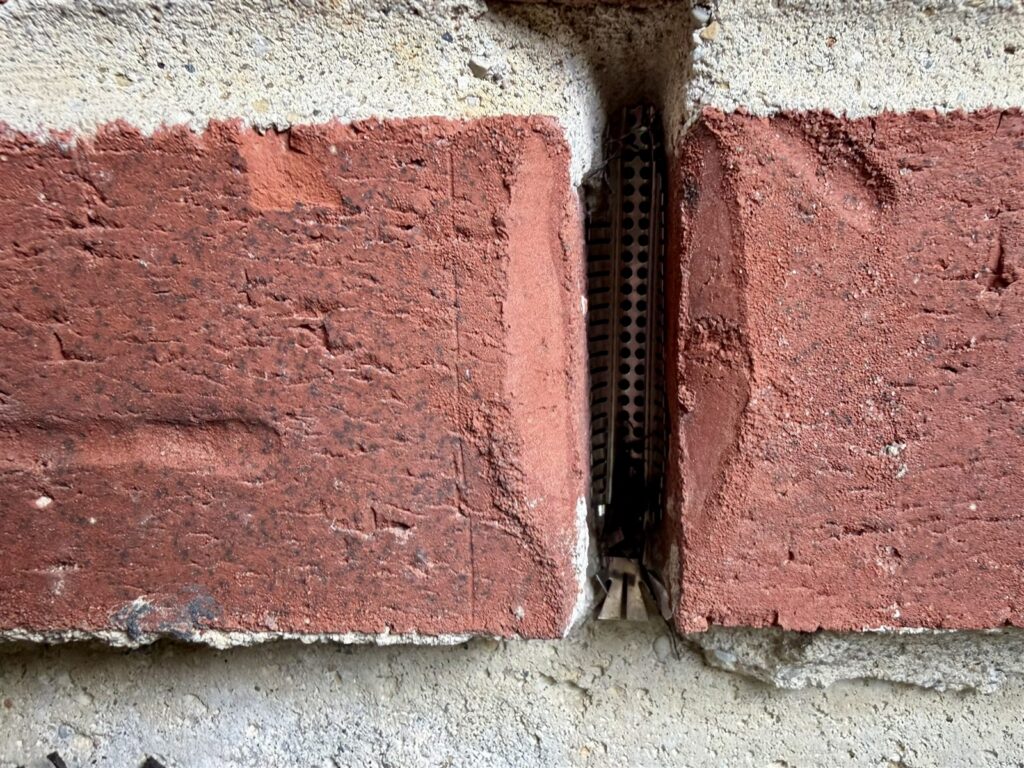
After finishing the garage, I did a slow walk around the exterior of the house and noticed something I’d never paid attention to before: the weep holes in the brick were all wide open.
Weep holes are the small rectangular gaps left at regular intervals in the mortar between bricks, usually near the base of the wall. They’re intentional — they allow moisture to drain out of the wall cavity. Most people walk past them for years without registering what they are. I had.
One on the front of the house made me stop. There was a small trail of dirt at the bottom of the opening, packed in the way it gets when something is going in and out regularly.
I found Weepa Protector weep hole screens — small metal mesh inserts that press into the opening and grip the sides of the weep hole to stay in place. They come with a plastic applicator tool you use to seat each screen. The metal mesh lets air and moisture pass through while blocking anything trying to squeeze in.
Most of mine needed to be trimmed to fit — have scissors or tin snips handy. It’s not difficult, and the instructions walk you through it. I covered somewhere between 10 and 20 holes going around the house. Only the one on the front had obvious evidence of use. The rest looked untouched, which doesn’t mean much — you don’t always get a dirt trail to tell you something’s been there.
If you have brick on your house — not just the garage, the whole house — check the weep holes. Look for any sign of disturbance at the bottom of the opening. It’s a 20-minute job to cover all of them, and it’s the step most pest-proofing guides skip entirely.
Where Things Stand
The small trails of turds dropped off significantly after all of this. I still find an occasional dropping now and then, but the pattern is different — not frequent, not clustered, not pointing to an active entry point.
My best guess: what’s left is probably from the garage door being left open. When the kids grab bikes or scooters, the garage door can be open for a couple hours at a stretch. A mouse that wanders in isn’t a mouse I failed to seal out — it’s a mouse that walked through an inviting open door, which is a different problem I may just have to live with.
If you go through this kind of systematic sealing pass and activity nearly stops, that’s probably where you are too. The goal was never to make the garage impossible to enter. It was to remove the easy, invisible routes that let mice treat it as a regular destination. That part worked.
A Few Things I’d Tell Someone Starting This
Get down low and look from floor level — inside and outside. The gap you need to find is often invisible from standing height.
Match the material to the surface. Standard caulk on a brick exterior looks out of place and may not bond as well. Mortar caulk with sand is the right call, and it’s not expensive.
Plan for two sides on any exterior gap. The inside treatment and outside treatment can be different materials depending on what each surface needs.
Check the vertical door seals, not just the bottom sweep. Mice go for the sides where the seal is softer and there’s often a corner gap right below the track.
And look at the floor-to-driveway joint. It’s easy to overlook because it doesn’t look like a wall gap, but mice move along the floor line, and a joint that’s opened up is a direct path inside.
Products used: Xcluder weatherstrip shields, coarse steel wool, Great Stuff expanding foam, 1/4-inch hardware cloth, mortar replacement caulk with sand, semi self leveling concrete joint sealant, dry sand for texture matching, Weepa Protector weep hole screens.
Step by Step
A systematic pass through the most common mouse entry points in a garage with a brick exterior.
- Inspect and repair the door side seals
Check vertical rubber seals on both sides of the garage door for chew damage. Cover damaged sections with Xcluder metal weatherstrip patches — trim to length, peel the backing, press over the existing seal. Paint to match after installing.
- Seal the bottom corners where door frame meets foundation
From inside: pack with compressed steel wool, fill with expanding foam, cover with hardware cloth secured with a staple gun. From outside on brick: fill with sand-mixed mortar replacement caulk smoothed to match surrounding mortar lines.
- Seal the floor-to-driveway joint
Get down low and look along the floor line from inside and outside. Fill the joint and any cracks with semi self leveling concrete sealant. Dust with dry sand before it sets to blend with the surrounding concrete.
- Check exterior brick for eroded mortar
Walk the perimeter and look for cracked or eroded mortar joints, especially at the base of the wall. Fill voids with sand-mixed mortar replacement caulk, smoothed to match.
- Cover weep holes around the full house perimeter
Find every weep hole in the brick (small rectangular gaps in the mortar near the base of the wall) and install mesh screens. Weepa Protector inserts press in and grip the sides. Trim to fit as needed. Look for dirt packed at the bottom of any opening — a sign something has been using it.
Common Questions
Steel wool, hardware cloth, and expanding foam used together. Steel wool alone can be pulled out. Foam alone can be chewed through. The combination — steel wool packed into the gap first, foam over it, wire mesh as a backstop — is what holds long term.
Get low and look along the floor line from inside and outside. The most common entry points are the bottom corners where the door frame meets the foundation, the floor-to-driveway joint, and the vertical rubber seals on the sides of the garage door — not just the bottom sweep. Mice move along floor lines and walls, not through the middle of open spaces.
Yes. Weep holes are intentional gaps in brick mortar that let moisture drain out of the wall cavity — and they’re typically wide open at exactly the right height for mice. Cover them with Weepa Protector mesh inserts or similar products that allow airflow and drainage while blocking entry. Check for signs of use: a small trail of dirt packed at the bottom of the opening.
A thorough sealing pass — door seals, corners, floor joint, exterior brick gaps — takes a full day. If you’re also covering weep holes on the house exterior, add another hour or two depending on how many you have. The job is mostly crawling around looking for gaps, not the repairs themselves.