We’d had the crawl space professionally encapsulated — vapor barrier on the floor and lower walls, a small dehumidifier running in the utility room next door. The difference was obvious: less humidity, less of that musty basement smell, noticeably more stable temperatures down there. Once I saw what the encapsulation did, I started looking at what was still unaddressed. The rim joists — the band of framing that runs along the top of the foundation wall where the floor structure meets concrete — were completely open. No insulation, no air seal, just wood sitting against concrete with gaps at every joist bay.
That’s a lot of surface area where outside air can move freely into the floor system. Fixing it seemed like the logical next step after the encapsulation.
Two approaches, one clear choice for me
I found two workable options. The first is filling each joist bay entirely with spray foam — no cutting, no fitting, just expand-in-place. The second is cutting rigid foam board to fit each bay and sealing the edges with spray foam.
I’ve never been good at keeping spray foam where it belongs. The all-spray-foam approach sounded like a project where I’d end up with foam on everything except where I wanted it. Foam board with spray foam around the edges gave me a lot more control — the board handles the bulk of the insulation, and the spray foam only needs to cover a thin perimeter bead. That’s a much more forgiving job.
What I used
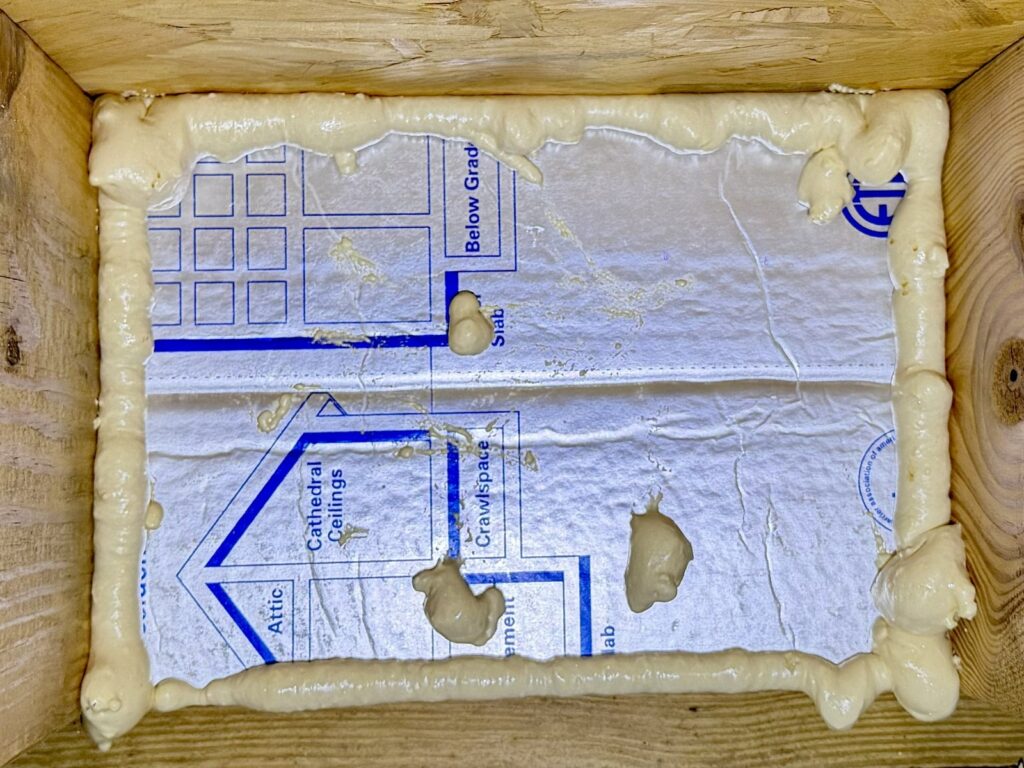
Foam board: 1.5-inch foil-faced foam board from Johns Manville, rated for below-grade and exterior wall use. The foil facing matters here — it’s fire resistant, which meant I didn’t need to cover it with drywall afterward. The crawl space is used only for storage, so leaving the foam exposed was fine.
Spray foam: Great Stuff, the minimal-expanding “gaps and cracks” version. It still made a mess — I still made a mess — but “minimal expanding” is genuinely less chaotic than regular Great Stuff when you’re trying to run a bead around the perimeter of a foam board piece in a tight space.
Tools: Utility knife, tape measure, cheap padded knee pads, and a shop vac. The shop vac came first — I ran my head into enough spider webs on the initial pass that vacuuming them out before starting was worth a few minutes of extra time.
Don’t use a table saw
The foam board comes in 4×8 sheets. My plan was to run them through the table saw to cut long strips at the right height, then cut each strip to width by hand. That kicked out a huge amount of foam dust — it went everywhere. On me, on the saw, in the garage, apparently in my lungs.
An online post showed me the way: score the cut line with a utility knife and snap the board like you’d snap drywall. It breaks cleanly along the score line. Faster, no dust, no mess. I wish I’d known this before the table saw incident.
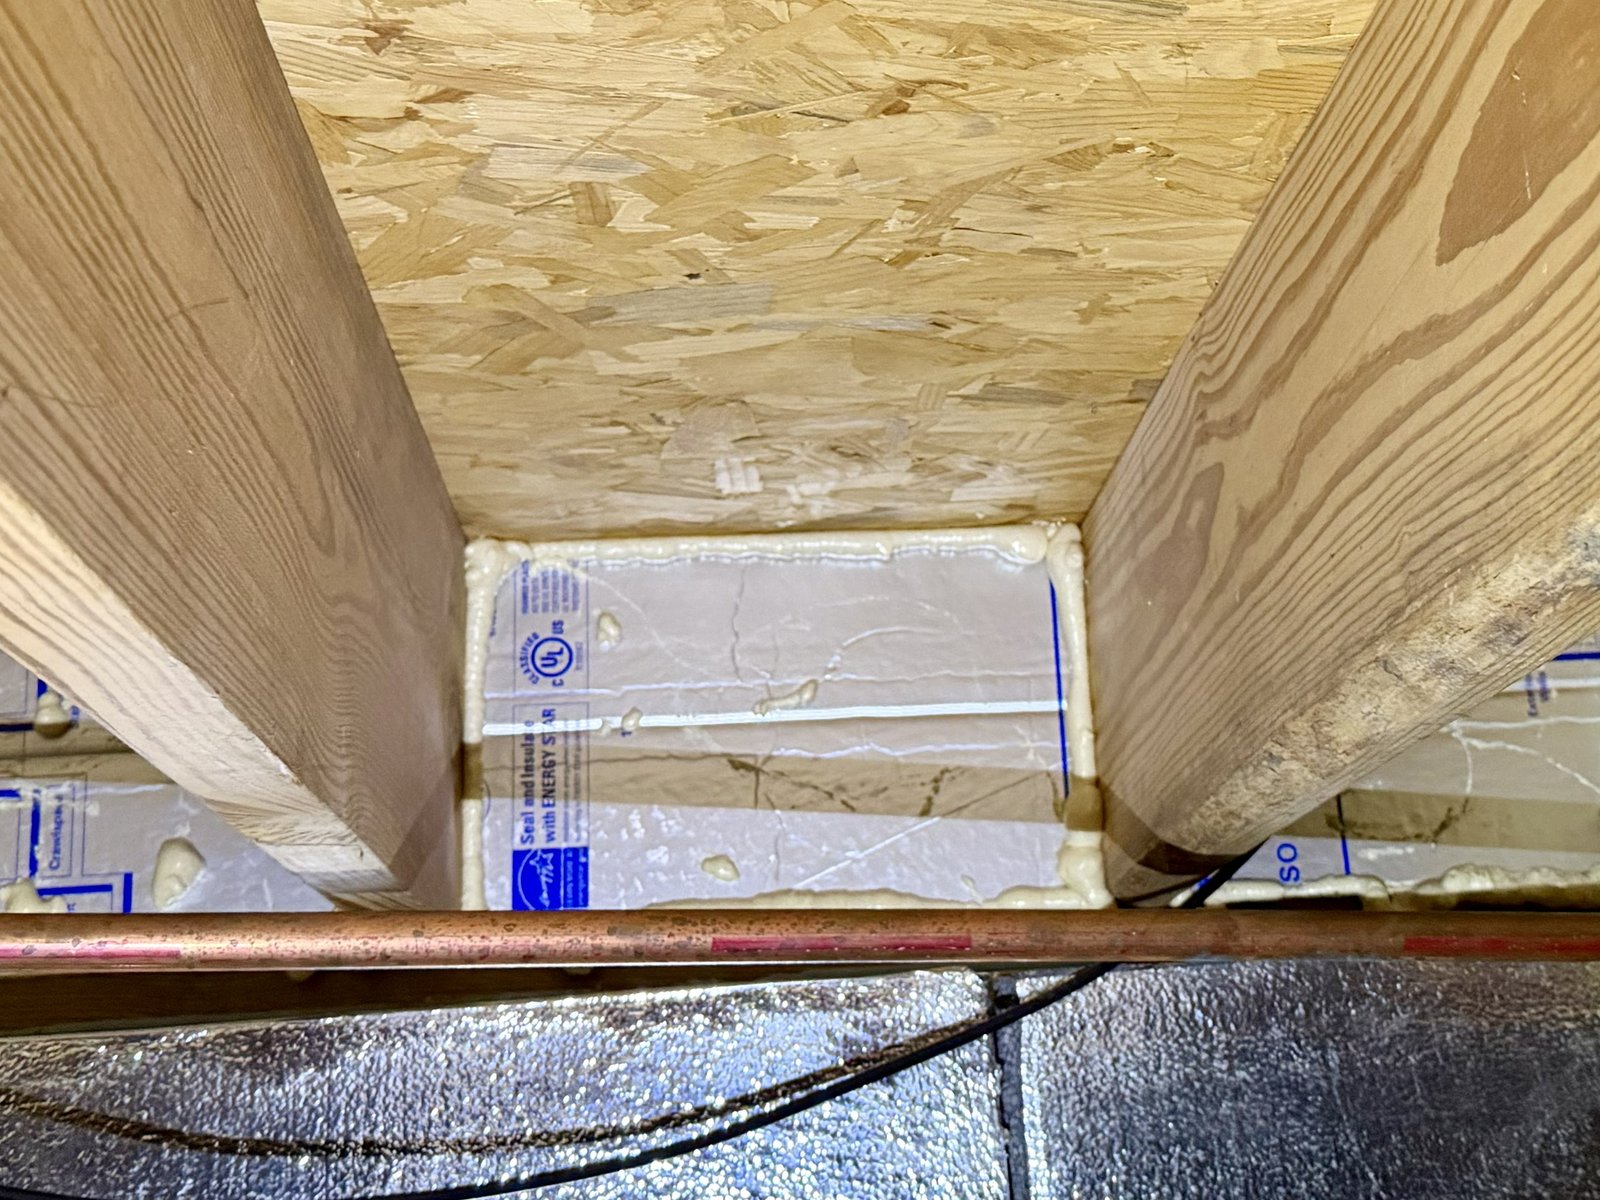
The height of my rim joists was consistent around most of the house, so I could score and snap a consistent strip and then cut pieces to width from that. The widths were almost never the same — every joist bay was slightly different. Measure each one before you cut.
What the crawl space is actually like to work in
Ours was already encapsulated, which helped a lot — the floor and lower walls were clean, and I wasn’t crawling through dirt and debris. I could sit upright when I was between floor joists, but otherwise I was on hands and knees moving from bay to bay around the perimeter. I was grateful for the knee pads.
The work took me two long days. I was learning as I went — figuring out the score-and-snap method partway through, figuring out the spray foam angles, figuring out where the awkward sections were. Vacuuming my mess. Someone who knew what they were doing going in could probably get through it in a long afternoon.
One wall of the crawl space butts up against the garage. Before I started insulating that section, I stuffed steel wool into every gap I could find at the foundation line. The same sealing logic applies to the garage exterior — if you have gaps at the foundation, here’s how I handled those on the garage.
The spots I left open
Almost every joist bay was a different width. The front of the crawl space, under a sunken living area, had taller rim joists than the rest of the house. Getting the spray foam can into position along corners and between joists in the right orientation took some fumbling, and I oversprayed a few sections. In a non-visible space, I didn’t worry about it.
The harder sections were where ductwork runs through the rim joist area. For one bay, I cut a piece in half and insulated around the duct as best I could. For two small spots near the front edge where the geometry was just too complicated — tight quarters, odd angles, ductwork in the way — I left the rim joists open. Not perfect, but I wasn’t going to spend two hours trying to jigsaw pieces and squeeze myself into position for two small sections.
If you’re doing this project, it’s not the end of the world to leave a few spots. The 95% solution is better than fighting the last 5% for twice the time. At least for me.
What changed
The most visible change is that the crawl space just looks finished. The foil-faced foam board catches light and the perimeter looks intentional instead of neglected.
The more useful change is that the crawl space and utility room are less prone to temperature swings — not cold in winter, not hot in summer — and the humidity stays lower. The musty smell that was already reduced after encapsulation got better again. Hard to separate what the encapsulation did from what the rim joist insulation added on top of it, but the combination works.
Products used: Johns Manville 1.5-inch foil-faced foam board (below-grade rated), Great Stuff Gaps & Cracks minimal expanding foam sealant, utility knife, cheap padded knee pads.
Step by Step
Insulating rim joists with cut-and-cobble foam board in a crawl space.
- Vacuum the crawl space
Remove spider webs and debris before starting work. Running into spider webs while trying to reach corners in a tight space gets old fast.
- Measure each joist bay
Heights are usually consistent around the house; widths vary bay to bay. Measure each width individually before cutting your piece.
- Score and snap the foam board
Score the cut line with a utility knife and snap the board cleanly along the line, like drywall. Don’t use a table saw — it kicks out foam dust everywhere.
- Fit each piece against the rim joist
Press the cut piece snugly in place against the rim joist. A friction fit holds most pieces without adhesive; use a few dabs of construction adhesive if a bay is loose.
- Seal the edges with spray foam
Run a bead of minimal-expanding foam around all four edges of each piece — where it meets the sill plate, subfloor, and both joists. Also hit any visible cracks or gaps in the rim joist itself.
Common Questions
Foil-faced foam board has a fire-resistant facing, so many jurisdictions allow it exposed in a storage-only crawl space. Check your local building code — rules vary by area.
1.5 to 2 inches. Thinner than 1.5 inches gives too little R-value; thicker can make fitting pieces into tighter joist bays harder.
One to two days if you’re learning as you go. Someone familiar with the job could finish in a long afternoon.
No — you can insulate the rim joists in any crawl space condition. Encapsulating first makes the work cleaner and more comfortable, but it’s not required.